Store Food Medium Term (6-12 months)
Having long to medium-term food reserves can be a tricky subject for those of us who grew up relying on a refrigerator and mom going grocery shopping every week, or Dominos *cough* Pizza.
There is a simple and easy way to store months worth of food at home without purchasing freeze-dried foods (although we have those too, most with a 25 year shelf life!)
All it takes is a brake bleeder vacuum pump, some jars, a Foodsaver and Tattler lids.
Food storage is a key facet of prepping. It's easy.
If you buy anything with the links we provide on this page we might get a small percentage of the sale from Amazons end. For more info click here.
Overview
Let me start off by saying that we're only talking about dried foods here. If you want to save sauces and jams and the like, that's heat / pressure canning and that's a whole other subject.
We are defining medium-term food storage here as 6 to 12 months.
Longer than 12 months we would call long-term, and requires a little more effort and materials.

The basic system consists of buying bulk dried foods and storing them in canning jars.
The reason this is important: in some foods - mostly the grains - small insects have eggs somewhere in there which will hatch within a few weeks, and that holds true no matter where you get them from...pre-packaged or bulk.
And although they are an added source of protein, let's face it, most of us would probably prefer not to eat the bug-infested winter oats, right?
By reducing the amount of oxygen in the jars you can keep the eggs from hatching, which increases the time you can store dried foods stored by 3-5x.
We've had lentils stored this way that we're in great shape one year later.
Keep the jars in a cool, dry place. An indoor pantry or basement is ideal. A garage could work if you live in the northern climes and it stays below 75 degrees.
What Foods to Store
Here's the list of things we get from our local market that we store with this system:
- Beans: Mung, Black, Adzuki, Navy, Baby Lima
- Lentils: French, Green, Red, Black
- Rice: Brown, White, Jasmine, Arborio, Forbidden
- Wheat: Soft Winter, Couscous
- Seed: Hemp, Chia, Sesame, Flax
- Peas: Chick, Green Split
- Flour: White, Wheat, Whole Wheat
- Corn Kernels
- Oatmeal & Grits
- Goji-Berries, Raisins, Dried Fruits, Nuts
We have been using this system for years, so it's been tested and refined.
It's how we do our day-to-day groceries and ensure that we always have several months of food on hands that is easy to cook and varied enough as to not be miserable or become vitamin deficient should it be difficult to resupply.
Don't forget: some of the beans and seeds can also be sprouted for greens!
Tools You'll need
Here is what you'll need:
- Mason jars (we like the wide mouthed ones)
- Canning Funnel
- Blue Painters Tape
- Permanent Marker
- Tattler or Ball lids
- Foodsaver Jar Sealers
- Foodsaver System or
- Brake Bleeder Vacuum Pump
Ball Wide Mouth Quart (32 oz) Jars
Typical Price: $45
We like to have a variety of jar sizes. The sweet spot is the 32 ounce size, but we have plenty that are larger and smaller. You'll start to get a feel for what sizes you will need once you start using them, and how often you are eating that particular item.
Stainless Steel Canning Funnel
Typical Price: $10
You'll want one of these when filling up jars, unless you like spilling stuff all over the floor of the supermarket or your house. Fun!

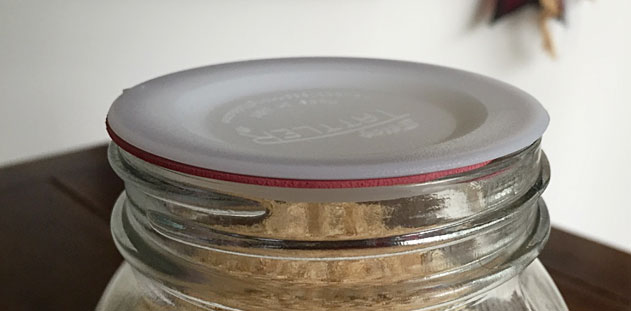
Tattler Reusable Lids
Typical Price: $4
These BPA-free lids can be vacuum sealed to canning jars, using the traditional methods or with a brake bleeder pump as described below.
Unlike metal lids, these can be reused, even when pressure sealed.
We use the regular and wide-mouth sized lids since we have a variety of jar sizes. The next most important thing to get is the FoodSaver Jar Sealers, also in regular and wide-mouth sizes. They are usually around $10 each.
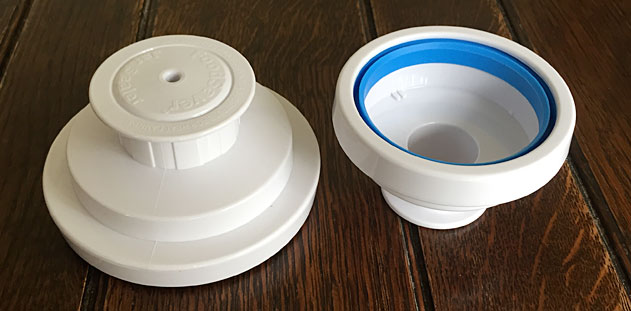
You place these on top of the jars once you've put the Tattler lids on. This is the device which creates the seal around the lid and allows air to escape from inside the jar past the lid but not get back inside.
FoodSaver Jar Sealers
Typical Price: $20
The jar sealer works with any FoodSaver vacuum sealing system (machine not included). Simply connect one end of the jar sealer to the machine's accessory port and the white, round-shaped end to the top of a lidded Mason jar, so that it fits securely over the screwed-on lid.
With the push of a button, the system quickly extracts all the air from inside the jar, pulling it out through the flexible tubing to form an air-tight seal.
Now you need a way to get the air out of the jars and create a vacuum.
Plan A:
The FoodSaver lids are meant to be used with their electronic FoodSaver System, which is what we use day-to-day.
Foodsaver Vacuum Sealer System
Typical Price: $80
In addition to sealing meats and food in plastic bags, you can use this as a vacuum pump with a tube and suck the air out of jars and bottles.
Just attach one end to the FoodSaver lid, turn this on and sit tight as it pulls the air out of the jar. It will stop itself once done.
Plan B:
For backup if the power goes out we have a Brake Bleeder Vacuum Pump. Only $22 and it gives you a workout to boot.
Hand Held Brake Bleeder Kit
Typical Price: $22
If the power is out, or you want a backup to the FoodSaver system, having an inexpensive brake bleeder pump will do the trick.
Just attach the end of the hose to it, and start pumping until you get to 20. More details below.
Step-By-Step
Here is our process from beginning to end. You can skip the parts where we get the food and go straight to the vacuum part if you already have food, or buy it another way.
Prepping the Jars
Wash out new jars, and let them dry very thoroughly before using.
Then we put 4 pieces of paper tape on the front of each jar. They each have a purpose:
- Tare (empty weight of the jar
- The Bulk Food Code
- Description
- Date canned
We do it this way, so if one piece needs to be replaced, the other information can stay on the jar.

How we label the jars. Painters tape can be hand-washed without getting ruined.
Procuring Bulk Foods
We bring our empty jars in a box to the grocery store and fill them up in the bulk section directly. This saves us from having to mess around with plastic bags or making lists of what's needed.
If you want to try this, float the idea past your grocery store manager first. They should be cool with it, depends on where you live and they store you are using. Don't ask a clerk. They always say no for some reason. Go straight to the manager.
When shopping bring in a box:
- Empty jars
- Canning Funnel
- Permanent Marker
- Extra tape
If you have new jars you haven't used yet, you will need to weigh or tare the jars empty at the customer service counter first, so the weight of the jars can be subtracted from the weight of the food inside at checkout. Write that weight on a piece of tape on the jars.
Since we've been doing this for a while our jars are already labeled, and when we use up everything inside them, the empties go in our grocery box so we know it's time to get more.
We dedicate jars to a specific food. This saves time so we aren't constantly remaking labels and changing product codes.
When we go to the store, we use solid lids, not the Tattler lids, as they are easier to screw on and off.

Bring the Canning Funnel so you don't spill food all over the place from the gravity fed bulk food dispensers!
Prepping for Storage

Once we get home we change the lids to the ones we will use with the vacuum system.
Grab your Tattler lids or the metal Ball ones that came with the jars.

Step 1: Place the Tattler rubber seal and lid to the jar.

Step 2: Put the end of the pump attachment into the hole at the top of the FoodSaver.

Step 3: If using the Brake Pump, squeeze like crazy until the arrow on the meter gets to 20. If it's not moving, make sure you have a good seal with the FoodSaver. If you are using the electric system, just push the lever down, hit the button and wait. It just turns itself off when complete.
There is some physical effort involved here, so it can be a little tiring at first. You probably won't want to do more that 1 or 2 jars a day.
Step 4: Remove the Foodsaver and gently check the seal on the Tattler lids by lifting on the edge a little. They should be stuck on there. We then like to screw on the metal bands that came with the metal lids we got from the initial jar purchase.
You're done! Now store in a dark cool place.
When it's time to open the jars up fully, pull them off slowly with your fingertips or with the edge of a spoon to slowly pry the lid from the jar.
Pro tip: The fuller the jar is with food, the less air you have to pull out of it. It might make sense to keep longer-term storage jars on their own, and when you finally open them up, empty them into smaller jars so you don't have to reseal the big ones each time.
That's really all there is to it.
If you want to get fancy you could put oxygen absorbers inside the jars (just under the lid before sealing) but that's probably an extra expense you really don't need since that leans more towards long-term storage.
Suggested Reading:
If you are really getting into the food storage game, I would suggest picking up this book. It goes over lots of details we glossed over here.
Making the Best of Basics
Typical Price: $10 - 40
We love this one so much we bought two of them. It's that useful, and in the event you will need the knowledge in the book (meaning you have no other options, you may want to adopt some of these practices already) that means someone else will too, so you have a spare copy for your extended family - you wont want to lend out your copy!


